Designed to increase customer recognition, trust, and engagement, Custom Branding helps ensure that customer-facing communications—Flow requests and emails—reflect your company's brand identity. Here’s how you can set up and use Custom Branding in your PDCflow account.
Adding Custom Branding
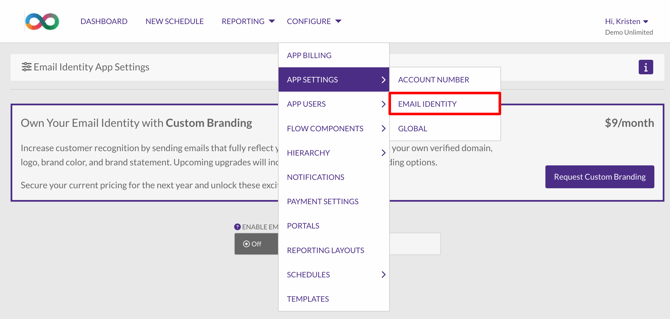
1. Request Custom Branding
- Admin Access: Ensure you have administrator permissions in your PDCflow account.
- Request Custom Branding: In your account, navigate to Configure > App Settings > Email Identity. Next, click on the "Request Custom Branding" option.
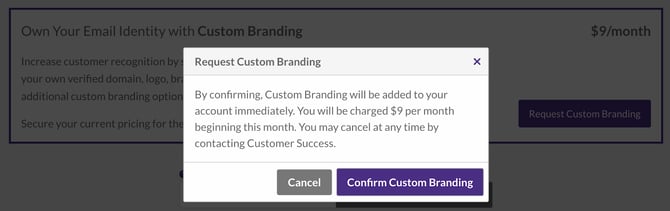
- Access Granted: After you've confirmed your request, Custom Branding will automatically be enabled for your account so that you can have access to Custom Branding configurations.
Configuring Custom Branding
1. Brand Color, Brand Statement, and Logo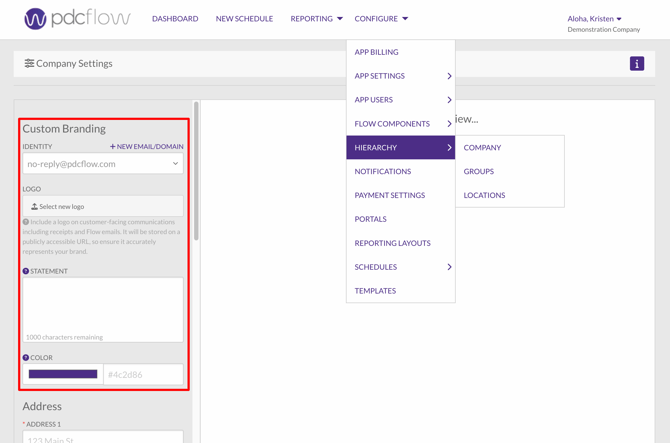
- Active Custom Branding: When custom branding is active for your company, admin users can configure the following:
- Custom Branding Color: Set your primary brand color using a HEX code (e.g.,
#ff0000). - Custom Branding Statement: Add a custom footer message to replace the "Powered by PDCflow" statement in emails and Flow requests.
- Custom Branding Logo: Upload a logo that will be displayed in emails and Flow requests.
- Custom Branding Color: Set your primary brand color using a HEX code (e.g.,
2. Verify an Email Identity
Verify an Email Identity Before sending emails to customers using a custom email identity, you must verify that the domain is genuinely under your control for authorized use. 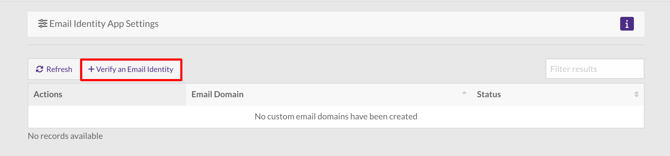
- Submit Domain: An admin user with access to email settings can submit a domain for verification in your account via Configure > App Settings > Email Identity. Input the domain in the provided field and click "Verify Domain." Note: Exclude the "www." part to ensure successful domain verification.
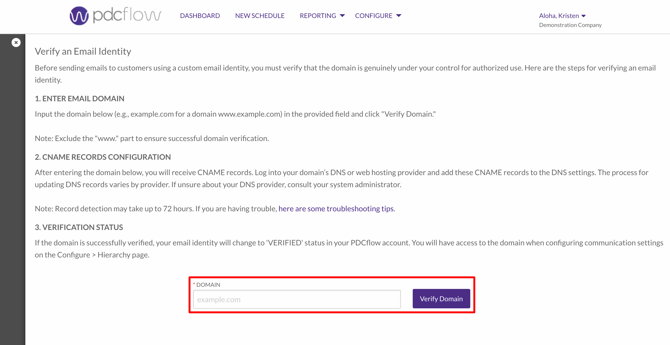
- DNS Adjustment: Adjust your DNS settings as required. After entering the domain (step 1) CNAME records will be provided to you. Log into your domain’s DNS or web hosting provider and add the CNAME records to the DNS settings. The process for updating DNS records varies by provider. If unsure about your DNS provider, consult your system administrator. Note: Record detection may take up to 72 hours. If you are having trouble, here are some troubleshooting tips.
- Verification Process: If the domain is successfully verified, your email identity will change to 'VERIFIED' status in your account. You will have access to the domain when configuring communication settings on the Configure > Hierarchy pages (Company, Group, or Location level pages).
3. Use a Verified Email Identity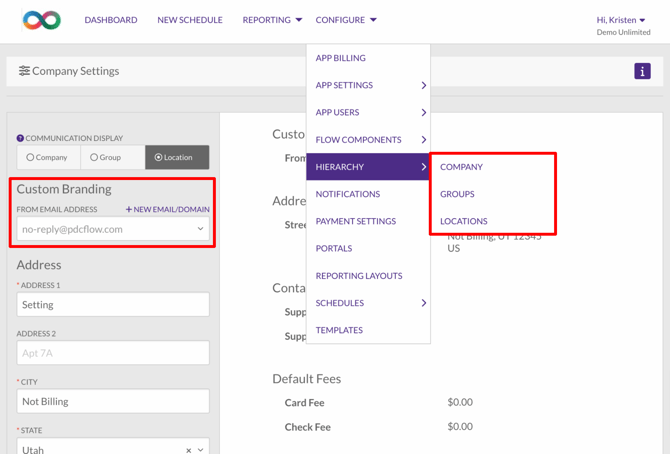
- Assign Email Identity: Once verified, the email identity can be assigned for use at the Company, Group, and Location levels.
Example email with Custom Branding:
Review and Test Your Custom Configurations
- Send Test Emails: Email yourself a payment receipt or other test emails to review how your custom branding elements appear.
- Adjust as Needed: Make any necessary adjustments to ensure that your emails reflect your brand accurately.
Known Limitations
- SMS Branding: Currently, Flows delivered via text message cannot be white-labeled. Learn more about text messaging with PDCflow via our A2P SMS Guide.
- Internal Notifications: Internal notification emails will still be branded as PDCflow to maintain brand visibility with direct customers.
Need Help?
Email our Customer Success team at support@pdcflow.com.